Grab Bar Installation for Seniors 2026: Complete Placement, Types & Cost Guide
Everything you need to know about installing grab bars for seniors — ADA-compliant placement guidelines, types and materials compared, DIY vs. professional installation, cost breakdown, and Medicare coverage options.

Why Grab Bars Are the Most Important Bathroom Safety Feature
Grab bars are the single most effective fall-prevention device you can install in a senior's bathroom. The CDC reports that one in four Americans aged 65 and older falls each year, and the bathroom is where the majority of these in-home falls occur. A properly installed grab bar provides a secure handhold that helps seniors maintain balance when standing, sitting, stepping over thresholds, and moving on wet surfaces.
Despite their proven effectiveness, only about 8% of U.S. homes have grab bars installed in their bathrooms. The reasons are often cosmetic — many people associate grab bars with institutional, hospital-like environments. However, modern grab bars have evolved dramatically. Today's designs include brushed nickel finishes that match luxury bathroom hardware, bars that double as towel racks or toilet paper holders, and minimalist styles that blend seamlessly with contemporary décor.
We consider grab bar installation to be the highest-impact, lowest-cost bathroom safety improvement available. A single well-placed grab bar can reduce fall risk by up to 30%, and a comprehensive installation of 4 to 6 bars throughout the bathroom provides layered protection at every transition point. For families beginning a broader senior bathroom renovation, grab bars should be the first item on the list. For those focused on overall home safety, our home safety assessment guide covers the full scope of fall-prevention measures.
"A $30 grab bar properly installed into a wall stud can prevent a $30,000 hip replacement. There is no better return on investment in senior home safety."
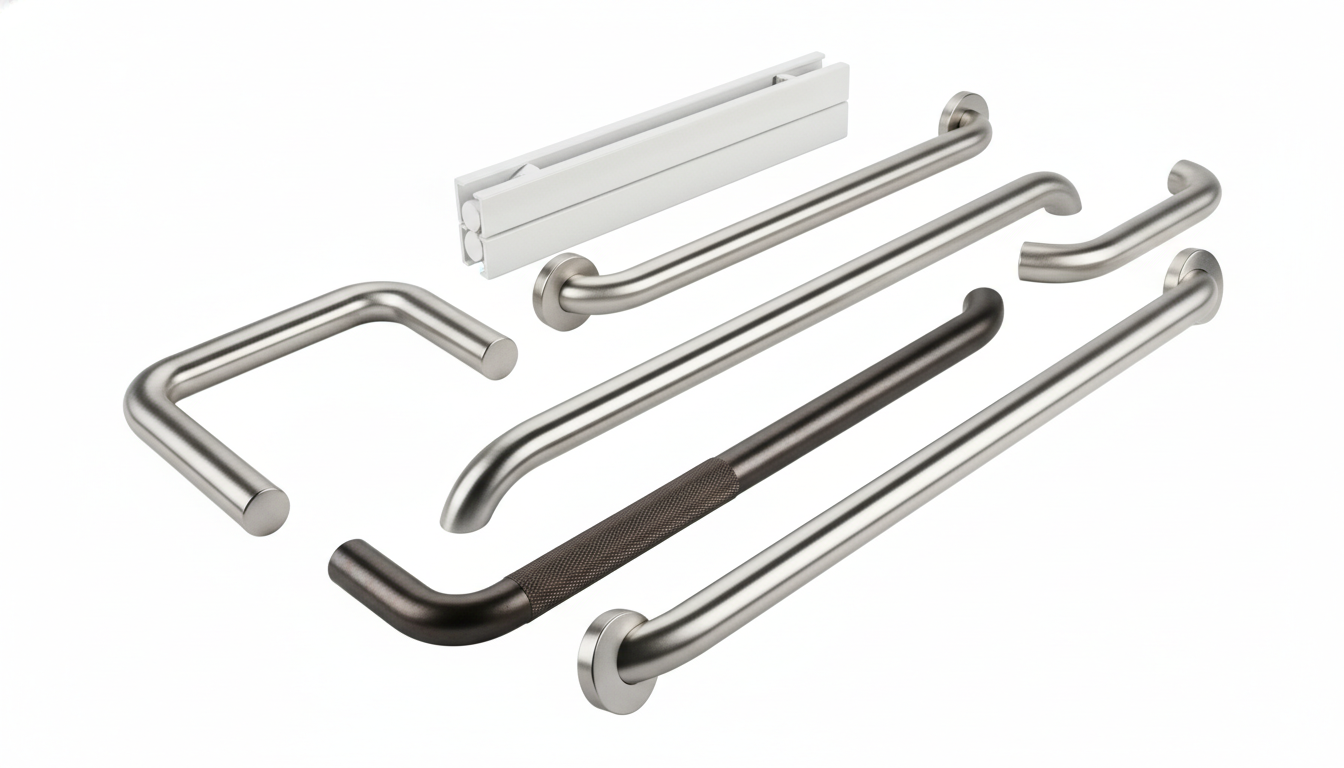
Types of Grab Bars: Choosing the Right Style for Every Location
Grab bars come in a variety of styles, each designed for specific bathroom locations and user needs. Understanding the differences helps you select the right combination for comprehensive bathroom coverage.
Straight horizontal bars are the most common and versatile type. They provide a stable handhold for lateral movement — walking along the shower wall, steadying yourself beside the toilet, or bracing while stepping into the tub. Standard lengths range from 12 to 42 inches. A 24-inch bar is the most popular size for general bathroom use, while 36 to 42-inch bars are ideal for inside the shower where more reach is needed.
Vertical bars are installed upright and are particularly useful at transition points — beside the shower entrance for balance while stepping in or out, next to the toilet for pulling up from a seated position, and near the bathroom doorway. They provide a natural grip orientation that many seniors find more intuitive than horizontal bars for standing up.
Angled (diagonal) bars are installed at 30 to 45 degrees and serve as combination grip points. They are especially helpful beside the toilet, where the lower end assists with sitting down and the upper end provides leverage for standing up. Many occupational therapists recommend diagonal bars as the single best grab bar type for toilet-side installation.
L-shaped bars combine a horizontal and vertical section in one unit, typically with a 90-degree bend. They are excellent for shower corners and beside the toilet, providing both lateral stability and vertical leverage. L-shaped bars reduce the number of separate installations needed while covering two grip orientations.
Flip-up bars mount to the wall on a pivot and fold up against the wall when not in use. They are commonly installed beside the toilet to provide armrest-style support. Flip-up designs keep the bathroom looking clean when the bar is not needed and allow close approach to the toilet for wheelchair users.
Suction cup grab bars use vacuum suction to attach to smooth, non-porous surfaces like tile, glass, or acrylic. We must emphasize: suction cup grab bars should only be used as temporary, supplementary aids — never as primary weight-bearing safety devices. They can lose suction without warning, especially on textured surfaces, grout lines, or in humid conditions. For permanent safety, always install mechanically fastened grab bars into wall studs or with appropriate anchoring systems.
Grab Bar Materials and Finishes Compared
The material and finish of a grab bar affect its durability, grip quality, weight capacity, and how well it integrates with your bathroom aesthetics. Here is how the most common options compare.
| Material | Weight Capacity | Price Range | Best For |
|---|---|---|---|
| Stainless Steel | 500+ lbs | $25–$80 | Maximum durability, heavy-duty use |
| Brushed Nickel (Zinc Alloy) | 250–500 lbs | $20–$60 | Matching modern fixtures, aesthetic appeal |
| Chrome-Plated Steel | 300–500 lbs | $15–$50 | Budget-friendly with classic look |
| Textured/Knurled Finish | 300–500 lbs | $25–$70 | Wet environments, extra grip needed |
| Nylon-Coated Steel | 250–400 lbs | $30–$90 | Color matching, warm-to-touch feel |
| Matte Black Steel | 300–500 lbs | $30–$75 | Contemporary/industrial bathroom design |
Stainless steel with a knurled or textured finish is our top recommendation for shower and bathtub areas where hands are wet and soapy. The texture provides reliable grip even when slippery. For areas outside the shower — beside the toilet and at the bathroom entrance — a smooth brushed nickel or matte black finish looks more like standard bathroom hardware and integrates beautifully with modern décor. Brands like Moen Home Care, Delta, and Ponte Giulio offer designer-grade grab bars that are virtually indistinguishable from towel bars to the casual eye.
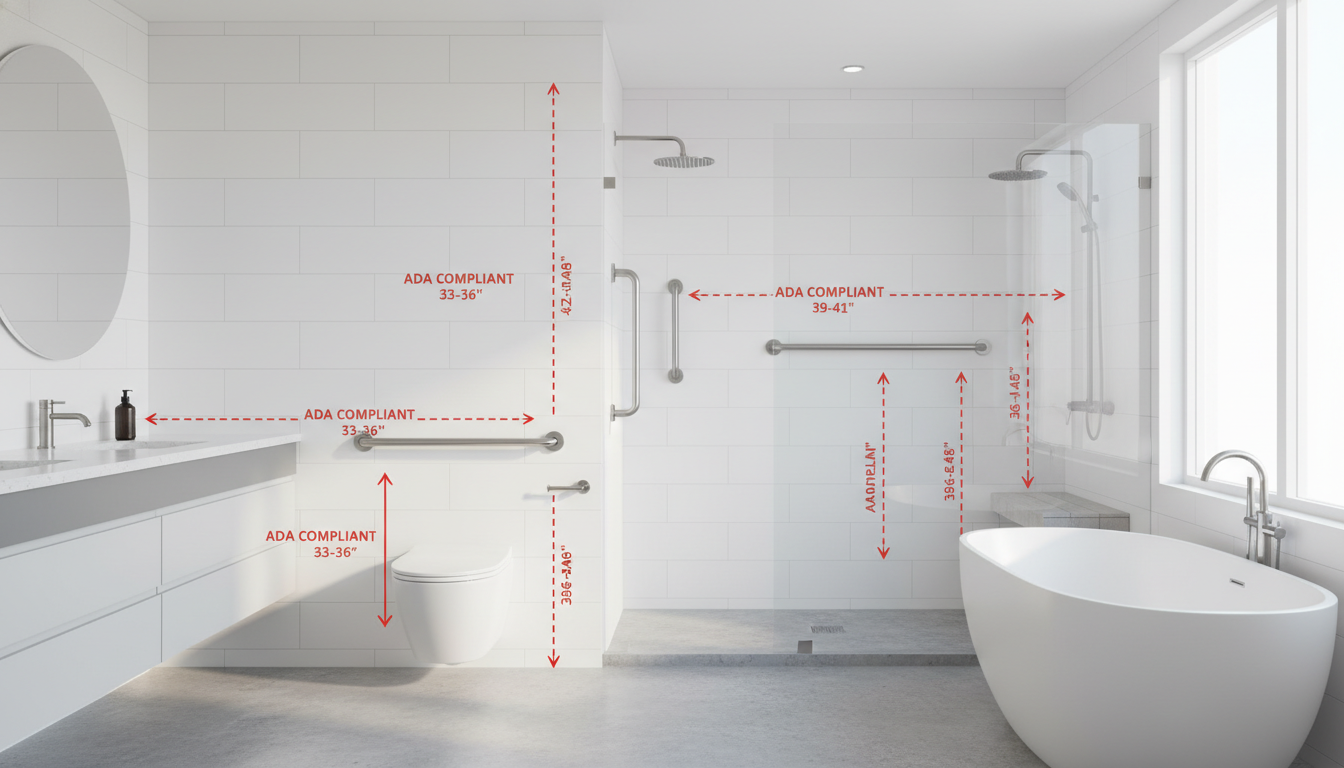
ADA-Compliant Grab Bar Placement Guidelines
The Americans with Disabilities Act (ADA) provides detailed specifications for grab bar placement in commercial and public facilities. While private homes are not required to follow ADA standards, these guidelines represent best practices developed through decades of accessibility research and are the gold standard for grab bar placement in senior bathrooms.
Beside the toilet: The ADA specifies a 42-inch horizontal grab bar on the side wall, positioned 12 inches from the rear wall, at a height of 33 to 36 inches from the finished floor. A 36-inch horizontal bar should also be installed on the rear wall behind the toilet, centered or extending toward the transfer side. For residential installations, we recommend adding a vertical bar on the side wall as well, extending from 33 inches up to approximately 56 inches — this provides leverage for standing.
Inside the shower: The ADA calls for horizontal grab bars on the side wall and back wall at 33 to 36 inches from the floor. A vertical bar at the shower entrance, extending from approximately 33 to 56 inches, assists with balance when stepping in and out. For walk-in showers with bench seats, an additional horizontal bar at seated height (approximately 8 to 10 inches above the bench surface) provides seated stability.
Inside the bathtub: Two horizontal grab bars should be installed on the long wall — one at 33 to 36 inches (standing height) and one at approximately 8 to 10 inches above the tub rim (seated height for use while in the tub). A vertical bar at the faucet end of the tub provides a handhold for stepping over the tub wall. Our non-slip flooring guide covers complementary bathtub safety measures.
General spacing rules: Grab bars should be mounted with 1.5 inches of clearance between the bar and the wall (ADA standard). The bar diameter should be 1.25 to 1.5 inches for a comfortable adult grip. All bars should support a minimum of 250 pounds of force, though we recommend 500 pounds for safety margin. See our bathroom accessibility resource for a comprehensive layout guide.
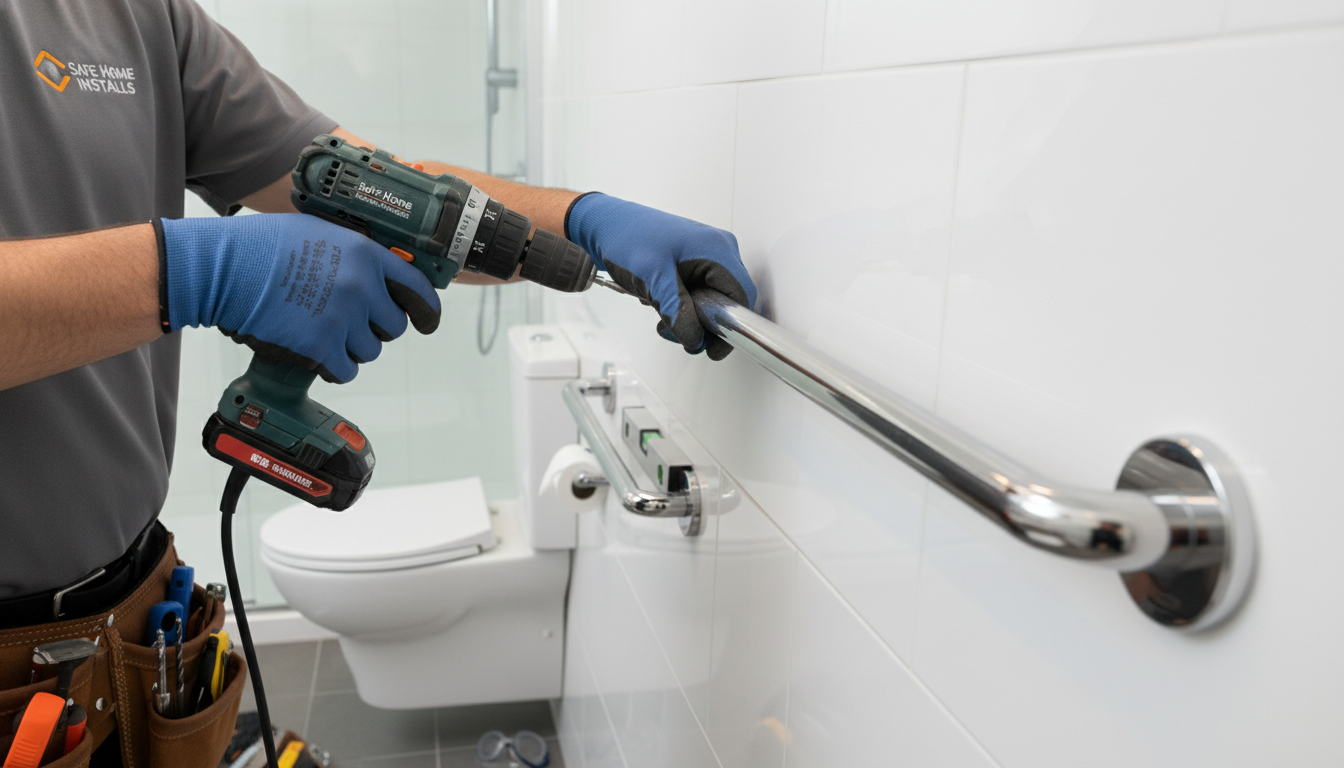
How to Install Grab Bars: Step-by-Step Guide
Proper installation is critical — a grab bar is only as strong as its mounting. Here is the professional method for secure grab bar installation that meets safety standards.
Step 1: Locate wall studs. Use an electronic stud finder to locate the wood framing behind the wall surface. Mark the center of each stud with painter's tape. Standard stud spacing is 16 inches on center, but this varies in older homes. For tile walls, a deep-scan stud finder that can read through tile and cement board is essential. If you cannot locate studs where you need the bar, you will need to use a mounting plate or blocking (covered below).
Step 2: Mark the mounting holes. Hold the grab bar in position at the desired height and mark the screw hole locations with a pencil. Use a level to ensure horizontal bars are perfectly level and vertical bars are plumb. Double-check that at least two mounting points align with wall studs.
Step 3: Drill pilot holes. For drywall over studs, drill pilot holes using a 1/8-inch drill bit. For tile, first use a carbide or diamond-tipped tile bit to drill through the tile without cracking it — use painter's tape over the drill point to prevent the bit from wandering, apply steady gentle pressure, and drill at low speed. Then switch to a standard wood bit to drill into the stud behind the tile.
Step 4: Install the grab bar. Apply a bead of silicone caulk around each pilot hole to prevent water infiltration. Attach the grab bar using the provided stainless steel screws (minimum #12 x 2.5-inch wood screws for stud mounting). Tighten firmly but do not overtighten, as this can strip the pilot holes. Cover screw heads with the decorative flanges included with the bar.
Step 5: Test the installation. Apply your full body weight to the grab bar by hanging from it. Pull sharply in multiple directions. The bar should feel completely rigid with zero movement. If there is any give, remove and reinstall with longer screws or into a confirmed stud location.
What to Do When Studs Are Not Where You Need Them
One of the most common challenges in grab bar installation is that wall studs do not always align with the ideal bar placement. Several proven solutions address this problem.
Blocking (backing board): The gold standard solution is to open the wall, install a piece of 2x6 or 3/4-inch plywood blocking between studs, then close and finish the wall. This provides a solid mounting surface at any location. If you are doing a bathroom renovation, have your contractor install blocking behind all walls at grab bar height (33 to 48 inches) — even if you do not plan to install bars immediately. The cost is minimal during construction but significant as a retrofit.
Toggle bolt anchors: Heavy-duty toggle bolts (such as TOGGLER SNAPTOGGLE) can support 250+ pounds in drywall when properly installed. They work by spreading the load across a larger area behind the wall surface. These are acceptable for supplementary grab bars but should not be the sole mounting method for primary weight-bearing bars. For tile over cement board, toggle bolts provide a strong connection to the rigid substrate.
WingIts mounting plates: WingIts is a brand specifically designed for grab bar installation in locations without studs. Their steel mounting plates spread the load across approximately 10 square inches of wall surface and are rated for 1,000+ pounds. They are approved by most building codes and are the preferred professional solution when stud mounting is not possible. Each plate costs approximately $20 to $35.
Fiberglass and acrylic surrounds: These thin-wall shower surrounds present a special challenge because they cannot support significant weight. The best approach is to install grab bars through the surround and into the studs behind it. If studs are not accessible, consider a floor-to-ceiling tension pole with grab handles, which transfers weight to the floor and ceiling rather than the wall. Our shower stall guide covers additional considerations for prefabricated shower units.
DIY vs. Professional Installation: Making the Right Choice
The decision between DIY and professional grab bar installation depends on the wall material, your comfort with tools, and the consequences of an improper installation. Here is an honest assessment of when each approach makes sense.
DIY is appropriate when: The grab bar will mount into drywall over wood studs, you own a stud finder and drill, you have experience with basic home improvement projects, and you can confidently verify that the bar is securely anchored. A competent DIYer can install a single grab bar in 30 to 45 minutes. Total cost for a DIY installation is typically $25 to $80 per bar (hardware only).
Professional installation is recommended when: The walls are tile, stone, or fiberglass surround; studs do not align with desired placement; the senior is heavy or will put significant weight on the bar; you need to install multiple bars throughout the bathroom; or the bathroom is being renovated and blocking can be added inside the walls. Professional installation costs $100 to $300 per bar including hardware and labor, or $400 to $800 for a comprehensive installation of 4 to 6 bars throughout the bathroom.
| Factor | DIY Installation | Professional Installation |
|---|---|---|
| Cost per bar | $25–$80 (hardware only) | $100–$300 (hardware + labor) |
| Time | 30–45 min per bar | 2–4 hours for full bathroom |
| Wall types handled | Drywall over studs | Tile, stone, fiberglass, any surface |
| Warranty | Product warranty only | Product + workmanship warranty |
| Risk level | Moderate — mistakes may not be apparent until bar fails | Low — professional verifies structural integrity |
Regardless of who installs the bars, always request or purchase bars rated for at least 500 pounds of static load. This provides a safety margin well above the 250-pound ADA minimum and accounts for the dynamic forces generated when a person grabs the bar during a stumble or fall, which can momentarily exceed body weight by 2 to 3 times.
Grab Bar Costs and Medicare Coverage
Understanding the full cost picture — and what insurance may cover — helps families budget for this essential safety modification.
Grab bar hardware costs range from $10 for a basic chrome bar to $150+ for a designer model from brands like Moen Home Care or Ponte Giulio. For most seniors, a mid-range stainless steel or brushed nickel bar in the $25 to $60 range provides the ideal balance of durability, grip quality, and aesthetics. A complete bathroom installation of 5 to 6 bars typically costs $150 to $400 in hardware alone.
Professional installation labor averages $75 to $200 per bar depending on wall material and complexity. Many handyman services offer package pricing for multiple bars — expect $400 to $800 for a full bathroom installation of 4 to 6 bars including hardware. CAPS-certified contractors who specialize in aging-in-place modifications are the best choice for comprehensive installations. See our bathroom remodel guide for contractor selection tips.
Medicare coverage for grab bars is limited under traditional Medicare. Standard Medicare Part A and Part B do not cover grab bars or their installation because they are classified as home modifications rather than durable medical equipment (DME). However, some Medicare Advantage (Part C) plans include home modification benefits that may cover grab bars — check your specific plan's supplemental benefits. The VA's HISA grant covers grab bars and installation for qualifying veterans.
Medicaid waiver programs in most states cover grab bar installation as part of Home and Community-Based Services (HCBS). Eligibility and coverage limits vary by state. Many Area Agencies on Aging offer free grab bar installation programs for income-qualifying seniors. Organizations like Rebuilding Together provide free home safety modifications including grab bars for low-income seniors and veterans. For a comprehensive list of financial assistance programs, see our aging in place services guide.
Common Grab Bar Installation Mistakes to Avoid
Even well-intentioned installations can compromise safety if common mistakes are not avoided. Here are the errors we see most frequently in grab bar installations.
Mounting into drywall only. This is the most dangerous mistake. A grab bar screwed only into drywall — without hitting a stud or using an appropriate anchor system — will pull free under body weight. Drywall alone can support only about 10 to 15 pounds per screw. A falling senior can exert 300+ pounds of sudden force on a grab bar. Always verify stud connections or use rated anchoring systems like WingIts mounting plates.
Installing at the wrong height. Grab bars that are too high force seniors to reach upward, which shifts their center of gravity and can actually cause falls. Bars that are too low require bending, which is equally dangerous. Follow the ADA guideline of 33 to 36 inches from the finished floor for horizontal bars — measure carefully and use a level.
Using the wrong screws. The screws included with some grab bars are too short for secure stud mounting. Replace them with #12 x 3-inch stainless steel wood screws for maximum holding power. Never use drywall screws, which are brittle and can snap under load. For tile installations, ensure the screws penetrate at least 1.5 inches into the stud behind the tile and cement board.
Relying on suction cup bars for primary safety. Suction cup grab bars have their place as temporary supplementary aids — in hotels, when visiting family, or as a short-term solution while planning a permanent installation. But they must never be the primary safety device in a senior's home bathroom. Suction failure is not a matter of if, but when, and it typically happens at the worst possible moment — when the senior actually needs to grab the bar.
Skipping the silicone seal. Every screw hole through tile or water-resistant wall material should be sealed with silicone caulk before the screws are driven. Unsealed holes allow water to penetrate behind the wall surface, causing mold growth, structural damage, and eventual failure of the grab bar mounting. A $5 tube of silicone prevents thousands of dollars in water damage.
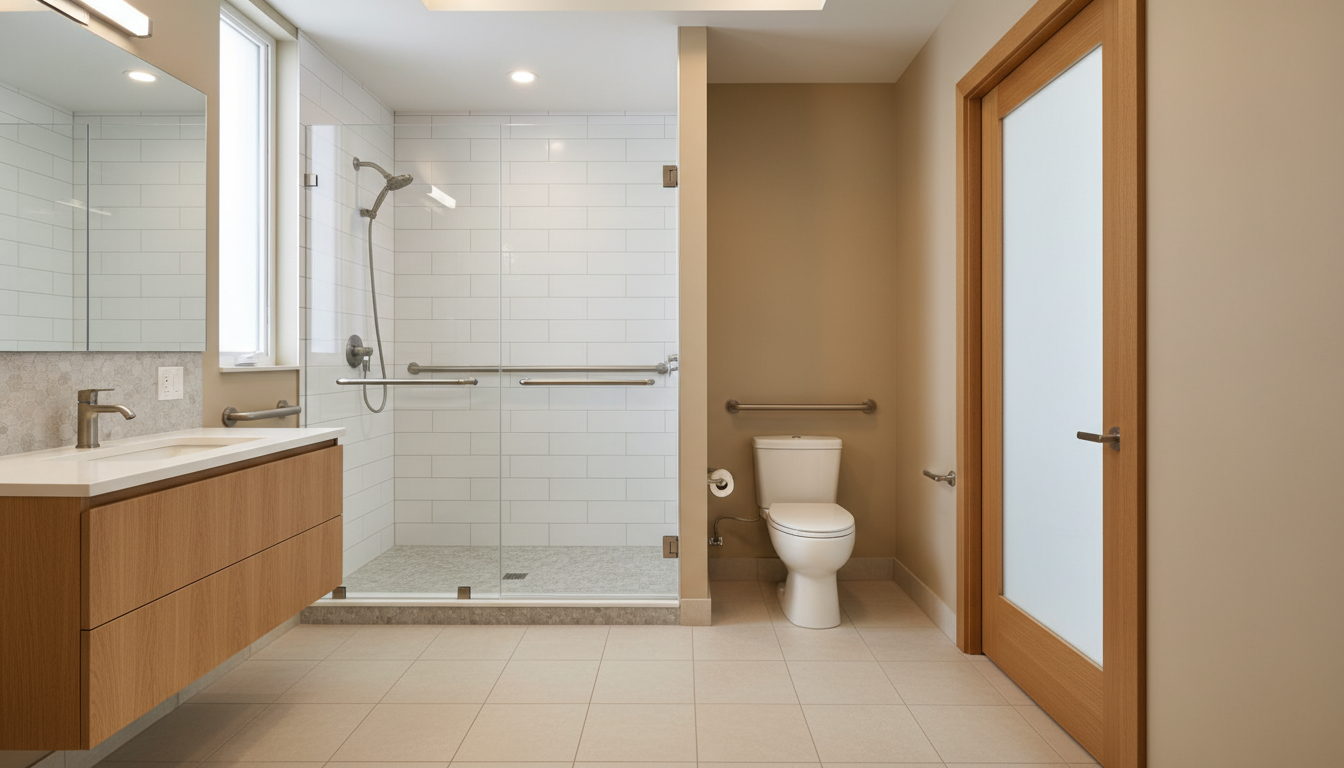
Installing only one bar. A single grab bar beside the toilet is a good start but leaves dangerous gaps. Seniors need support at every transition point: entering the shower, standing up from the toilet, getting out of the bathtub, and moving from the shower to the towel. A comprehensive installation of 4 to 6 bars eliminates the gaps between safety zones. For a holistic view, see our bathroom design for aging in place guide.
Grab Bars That Look Great: Combining Safety With Style
The number one reason seniors resist grab bar installation is the fear that their bathroom will look institutional. The good news is that modern manufacturers have completely solved this problem. Here are our top recommendations for grab bars that provide full safety functionality while enhancing bathroom aesthetics.
Moen Home Care offers a complete line of grab bars that match their popular bathroom faucet finishes — brushed nickel, chrome, matte black, and champagne bronze. Their SecureMount flanges are larger than standard, covering more wall area and providing a polished look. The Moen R8736 series even functions as a combination grab bar and towel bar, so guests may not even notice it is a safety device.
Delta Decor Assist is another line specifically designed to look like standard bath accessories while meeting ADA grab bar standards. Their toilet paper holder with integrated grab bar and their shelf with grab bar below are particularly clever — they add functionality while disguising the safety feature as a decorative element.
Ponte Giulio is an Italian manufacturer that produces some of the most architecturally beautiful grab bars available. Their colored nylon-coated bars come in over 20 colors and feature minimalist European design. They are popular in high-end aging-in-place renovations where aesthetics are a top priority.
For seniors who want maximum safety without any visible compromise, the best approach is to install grab bars in the same finish as existing bathroom hardware (towel bars, faucets, showerhead). When all hardware matches, grab bars read as part of a coordinated design rather than as medical equipment added after the fact. Our bath solutions guide includes additional product recommendations.
Frequently Asked Questions About Grab Bar Installation
How much does grab bar installation cost?
A single grab bar with professional installation costs $100 to $300 including hardware and labor. A comprehensive installation of 4 to 6 bars throughout the bathroom typically costs $400 to $800. DIY installation reduces the cost to $25 to $80 per bar (hardware only). The total depends on wall material, bar quality, and the number of bars installed.
Can I install grab bars myself?
Yes, if the bars will mount into drywall over wood studs and you are comfortable using a drill, stud finder, and level. DIY installation is not recommended for tile walls, fiberglass surrounds, or situations where studs do not align with ideal placement. Improper installation can be worse than no grab bar at all, as it creates a false sense of security.
Do suction cup grab bars work?
Suction cup grab bars provide only temporary supplementary support — they are not rated for full body weight and can detach without warning. They are appropriate for travel, temporary use in rentals, or as an additional handhold alongside permanently mounted bars. For primary bathroom safety, always install mechanically fastened grab bars anchored into wall studs or with rated mounting plates.
Does Medicare cover grab bars?
Traditional Medicare (Parts A and B) does not cover grab bars or their installation. Some Medicare Advantage plans include home modification benefits that may cover grab bars. Medicaid HCBS waiver programs in most states cover grab bars for qualifying individuals. The VA HISA grant covers grab bars for qualifying veterans. Check with your specific plan and state Medicaid office.
What height should grab bars be installed?
The ADA standard is 33 to 36 inches from the finished floor for horizontal grab bars. Vertical bars at the shower entrance or beside the toilet should extend from approximately 33 inches to 56 inches from the floor. The ideal height may vary slightly based on the senior's height and whether they primarily use the bar from a standing or seated position.
How much weight can grab bars hold?
Quality grab bars properly installed into wall studs are rated for 250 to 500+ pounds of static load. The ADA minimum is 250 pounds. We recommend bars rated for at least 500 pounds because dynamic forces during a fall can momentarily exceed the senior's body weight by 2 to 3 times. Always check the manufacturer's weight rating before purchasing.
Can grab bars be installed in a fiberglass shower?
Yes, but the bars must be installed through the fiberglass surround and into the wall studs behind it. The fiberglass itself cannot support weight. Use a backing plate or large flange to distribute force across the fiberglass surface and prevent cracking. If studs are not accessible, consider a floor-to-ceiling tension pole with grab handles as an alternative.
Where should I install grab bars in my bathroom?
At minimum, install bars in these four locations: (1) beside the toilet on the side wall, (2) on the back wall behind the toilet, (3) inside the shower on the long wall, and (4) at the shower or tub entrance. For comprehensive coverage, add bars at (5) seated height inside the shower, and (6) near the bathroom doorway. Our fall prevention resource provides additional placement guidance.
Margaret Chen
Certified Aging-in-Place Specialist & Senior Care Advisor
Margaret is a CAPS-certified senior care advisor with over 15 years of experience helping families navigate the complexities of aging at home. She specializes in home safety assessments, bathroom accessibility, and connecting families with trusted local contractors and care services. Her work has helped hundreds of seniors maintain independence in the homes they love.


Need Help Installing Grab Bars?
Our team connects you with CAPS-certified contractors who install grab bars correctly the first time. Get a free home safety assessment and installation quote today.
Get a Free Assessment